How to make the Celtic shuttles
I started with a laundry detergent jug. Initially I tried cutting narrow flat shuttles from its sides, but these turned out to be much too soft. Then I noticed that there were ribs on the bottom of the jug: |
| Ribs on the bottom of a 5-L / 1 gallon laundry jug |
The ribs are only found on the larger sizes of jugs (five litres or one gallon). This particular jug seems to be made partly of recycled material, and it is quite soft and easy to cut, so the ribs are needed for stiffening. So:
Step 1. Cut off the bottom of the jug. I'd actually recommend that you include a bit more of the side than I did here.
 |
| Ribbed bottom of a gallon jug |
Step 2. Cut strips from the bottom of the jug. One rib in each strip, two strips for each shuttle. Match the lengths of the strips — the outer ribs are shorter, the inner ribs are longer.
 |
| Cut along the sides of the ribs |
Step 3. Trim the strips so that they're no wider than the ribs, and cut the ends so that they taper a bit. For these particular jugs, I found that a sharp pair of scissors worked better than a knife or box cutter.
 |
| Notice that the tips point upwards from the table top |
Step 4. Use an awl to drill two or three holes along the middle of the ribs. Nest the ribs so that they lie close against each other, then drill a hole about one inch from each end, and another halfway along the length. Drill through both pieces.
 |
| Rib strips with awl |
 |
| Nested strips after the holes have been drilled |
 |
| Convex sides of the ribs now facing - tips come together |
Step 6. Sew the two strips together with sewing thread. For longer shuttles, use a figure-8 method of sewing. Sew through the holes several times and tie off securely.
Step 7. Trim the sides and ends to make the shuttle as smooth and slim as possible. But don't cut the ends shorter, or the tips won't meet. The shuttle is now finished! :-D
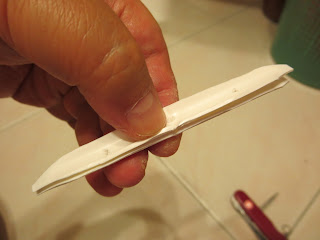
The finished size is about 4 in / 10 cm long. It has a square cross-section, about 0.4 in / 1 cm wide across the diagonal. The exact length and width will depend on the jug you use, and which part of the bottom you cut the strips from.
 |
| Completed shuttle |
 |
| Completed shuttle - tips come together |
The shuttles in use
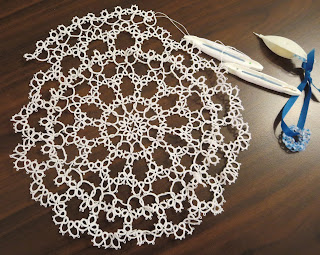
For the Japanese Twisted Clover Doily, I used two of my homemade shuttles. I was able to wind about nine armspans on each of them. The fully wound shuttles were just narrow enough to pass through the spaces below the clovers (as explained in my previous post).
 |
| Japanese Twisted Clover Doily with homemade Celtic shuttles |
 |
| My homemade Celtic shuttle passing through the chain space in the clover round |
So, these shuttles were just right for this project. Narrower than regular celtic shuttles, but wider than the super-slim acrylic Celtic shuttles. For me, it was important that their tips came together so that the thread didn't unwind every time I dropped or laid down the shuttle.
I hope my instructions have been clear; please let me know if you need any further clarification. If you try making similar shuttles, I would love to see some pictures! ;-)
