Thursday, 26 November 2015

Celtic shuttles from a laundry jug

As I explained in my previous post, none of the Celtic shuttles I had on hand were quite right for the Japanese Twisted Clover Doily, so I ended up making my own.

How to make the Celtic shuttles

I started with a laundry detergent jug. Initially I tried cutting narrow flat shuttles from its sides, but these turned out to be much too soft. Then I noticed that there were ribs on the bottom of the jug:

Ribs on the bottom of a 5-L / 1 gallon laundry jug

The ribs are only found on the larger sizes of jugs (five litres or one gallon). This particular jug seems to be made partly of recycled material, and it is quite soft and easy to cut, so the ribs are needed for stiffening. So: 

Step 1. Cut off the bottom of the jug. I'd actually recommend that you include a bit more of the side than I did here.

Ribbed bottom of a gallon jug

Step 2. Cut strips from the bottom of the jug. One rib in each strip, two strips for each shuttle. Match the lengths of the strips — the outer ribs are shorter, the inner ribs are longer.

Cut along the sides of the ribs

Step 3. Trim the strips so that they're no wider than the ribs, and cut the ends so that they taper a bit. For these particular jugs, I found that a sharp pair of scissors worked better than a knife or box cutter.

Notice that the tips point upwards from the table top

Step 4. Use an awl to drill two or three holes along the middle of the ribs. Nest the ribs so that they lie close against each other, then drill a hole about one inch from each end, and another halfway along the length. Drill through both pieces.

Rib strips with awl

Nested strips after the holes have been drilled
Step 5. Turn one strip over so that the convex surfaces of the ribs face each other. The holes should still be nicely lined up. See how the tips of the strips now come together? :-)

Convex sides of the ribs now facing - tips come together

Step 6. Sew the two strips together with sewing thread. For longer shuttles, use a figure-8 method of sewing. Sew through the holes several times and tie off securely.


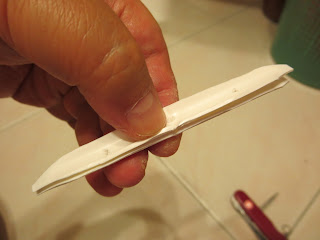
Step 7. Trim the sides and ends to make the shuttle as smooth and slim as possible. But don't cut the ends shorter, or the tips won't meet. The shuttle is now finished! :-D

The finished size is about 4 in / 10 cm long. It has a square cross-section, about 0.4 in / 1 cm wide across the diagonal. The exact length and width will depend on the jug you use, and which part of the bottom you cut the strips from.

Completed shuttle

Completed shuttle - tips come together

The shuttles in use 

For the Japanese Twisted Clover Doily, I used two of my homemade shuttles. I was able to wind about nine armspans on each of them. The fully wound shuttles were just narrow enough to pass through the spaces below the clovers (as explained in my previous post).
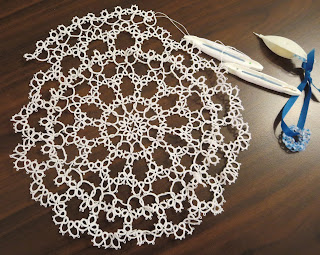
Japanese Twisted Clover Doily with homemade Celtic shuttles

My homemade Celtic shuttle passing through the chain space in the clover round

So, these shuttles were just right for this project. Narrower than regular celtic shuttles, but wider than the super-slim acrylic Celtic shuttles. For me, it was important that their tips came together so that the thread didn't unwind every time I dropped or laid down the shuttle.

I hope my instructions have been clear; please let me know if you need any further clarification. If you try making similar shuttles, I would love to see some pictures! ;-)

Wednesday, 28 October 2015

Japanese twisted clover doily by Sumi Fujishige

Here I am, after a break of almost a year. I will try to fill out all the things I promised to show you - or at least some of them!

So, item 1 - Japanese doily. This is Doily 11 in Tatting Lace by Sumi Fujishige. She has at least one other book with the same title, but this is the one with the biggish doily on the cover. Here's a listing for it.

Doily 11, Tatting Lace by Sumi Fujishige
This doily is very pretty, and it grows quite fast. That's why I decided to tat it as a gift for my friend's mother. However, it proved tougher to do than I expected.

First problem — it really ruffles a lot!

Rounds 1 & 2

Actually, I had problems in Round 1. The clovers were quite squashed together. Never mind, I said, it will flatten out in Round 2. Well, it didn't …

Round 3 in progress
 Round 3 didn't fix it  either; it seemed even worse …

Rounds 1, 2 & 3 done

Yes, I am really impressed at the ruffling…

So, for the first time, I blocked a doily while it was still in progress.

Being blocked after Round 3
Did that fix it? Not really; the succeeding rounds were still ruffling…
Ruffling after Round 5

Ruffling after completing the doily
 So of course I blocked it after I finished the six rounds of the doily. Then it finally lay flat!

The finished doily after blocking
So then I rolled it into a tube with wrapping paper, and it went into my suitcase, and it travelled all the way from Singapore to Ecuador, then right across South America, and finally, in Buenos Aires, I presented it to my friend's mother, as a thank-you for hosting us. To my relief, it was still flat! She put it into her drawer of treasures, with her pieces of beautiful linen. And I fervently hope it's not ruffling up as it lies there quietly…

If I were to do this doily again, I wonder how I would reduce the ruffling. Was the ruffling so bad because there were too many clovers for the diameter of each round? Should I make the chains in the clover rounds a bit longer, then? I'd be interested in your ideas.

Second problem — the twist in the clovers 

The instructions show how the twist in the necks of the clovers is done — first you tat the chain after the clover, then you pass the shuttle through the window made by the previous chain and, voila, there's the twist. Ms. Fujishige used Size 10 thread and a Clover shuttle. I had some Size 10 thread, but it felt coarse and I hated tatting with it, so I switched to Lizbeth Size 20. But then the shuttle was too fat to pass through the window!

So I said, ok, I will twist the clover inside and through that window, tat the chain, then untwist the clover. But that didn't work very well. I ended up putting too many twists on the neck, and they didn't sit very well, and I couldn't seem to make them look consistent. I realised that I needed Celtic shuttles. I had a regular Celtic shuttle (shaped like a post shuttle, but longer and narrower), but that wasn't narrow enough. Then I tried the super-narrow Celtic shuttles made by Tony and Patty Dowden (e.g., here). These were certainly narrow enough — but I found them a bit annoying to use. Either I had to do a half-hitch of the thread on one tip and then it didn't unwind nicely, or I didn't do the half-hitch and then it would unwind every time I dropped the shuttle. I had never noticed before how often I drop the shuttle!

But, I finally solved the problem by making my own shuttles out of a laundry detergent jug. That will be the subject of my next post…